Showing posts with label sewing. Show all posts

Saturday, June 22, 2013

Backyard Happy Places

                !~!~!~!  Hello Hippy Friends  ~!~!~!


I have been busy in the backyard this summer... Our poor yard has taken a beating with this long, terrible drought. A beatin' with a long, dead, dry stick.... New Mexico is experiencing the worst drought in the entire USA right now. After two years of little rain, we are really feeling the "heat" and my poor yard is reflecting the experience.

I have decided that the backyard is in need of a little { long, over-due } TLC.  But I can honestly say I have felt overwhelmed bc our yard is BIG, SAD, and DEAD.

In trying to take this task on... I at first felt daunted... like it was insurmountable... and then I realized that there is only one way to "eat an elephant"....

I thought that starting w/ making small, "HAPPY PLACES" within this unconquerable badland would be at least do~able. I began to think of ways to create little fun, colorful  areas within the scheme of the desolation.  A friend that is working on her own yard { they are building a new home } has encouraged me by her own skills of making happy, little, fun places on her patio and around her trees ... Her own yard is HUGE... so.... watching her gave me creative spark.

Thx Butterfly ~!~!

One day this week, I looked at my tired, dejected glider. Faded... droopy.... and miserable. Now, I'm no Martha Stewart... I don't pretend to know how to sew the best... and I have never taken painting lessons but I had an idea of starting w/ this little sad~sack ....(the glider..... not Paco ~!~!) 


I found a large panel of fencing in our garage. It has been there for more than ten years.... I talked hubby into dragging it out and he made a brace and screwed it to the fence. { Thx hubby !!! U know sometimes that I'm in need of your 'manly, man-skills' . }

Off to Wal~Mart and Lowes. Black and Pink kept popping into my head and right away I found some material that I thought bright and cheerful.

The material is "ducking". I do not know how well this will hold up thru the heat that we have. But it cost me less than $20 to cover.. and so much cheaper than brand new cushions. I can change them next year very easily.
I spray painted the glider "Watermelon Pink" {Krylon} and gave the faded cushion a new cover. I didn't try to cover it exact. I made a large " pillow~case" type of cover and slipped the old cushion inside. My aunt helped out a great deal by covering the pillow and bringing an old couch cushion out of the garage to cover. I then made ties to "tie" it to the glider bc the pillows are what fly all over the yard when the wind blows. And we get horrible winds here.

Lowes has "sample" paints that are great for small projects. I purchased white, Berry Blush, and Iced Berry.  I had left over grey-black.

They cost about $2 each... (and I used very little paint ~!)


After doodling on scratch paper, I began with a pencil to stencil out what I could actually do on the fence. ... I did not use a purchased stencil. It is all done out of my own head... which means it is not perfect... But I do not aim for perfection in my projects.


I was very pleased with how this little "sitting area" turned out ~!~! It is shaded in the morning and a perfect place to sit and have my morning java and play the ukulele.
 A perfect little HaPpY pLaCe ~!~!~

                                           ~~~ Happy DIYing ~~~  


Monday, June 3, 2013

Aprons Out of Men's Shirts

Apron Made Out of a Man's Shirt
Repurposed Men's Shirts

This project is easy and fun. I like easy and fun... it's a great combo! My father passed more than two years ago and Mom gave me some of his dress shirts. A friend passed on a simple idea of making an apron out of a man's shirt. Dad wore a 2x tall-man and I knew this would be ideal... bc I need a large apron to cover up all the messes I make while cooking! I'm one sloppy cook! I knew this would be a great way to preserve memories and times of happiness w/ my dad bc this was his favorite shirt. We saw him wear it many times through the years.


Very cute and simple apron~!~!

How To...

Cut off the sleeves, and the back of the shirt. Be sure to leave about
and inch or more next to the seam because this will be tucked and sewn down
on top of the side seam that is already there.

From the collar, shoulder seam, measure 2 inches and mark with a pencil or
marking pen.

Measure from the mark to the bottom of the arm pit and draw
a straight line. Cut on that line.

You will need to iron (hippies always use irons and pins when they sew)
the seam making a "french hem" (sometimes called a shirt tale hem). Iron and then pin
into place as you go. Do this all around the apron: up both sides and to the collar and around the collar.

This hippie is the Queen of Zig-Zag. Begin zig-zagging close to one side of the
hem and then make another zig-zag stitch right next to it. This will ensure
that the hem is held into place and will not come unraveled during the wash.
I also like the "look" of this finish. I resembles a surger... I
don't have one .... so this comes close to making that stitch (in my
novice opinion).

For the ties, Cut out two long strips from the remnants. Make them 2 inches
wide. Press a center fold and then fold both edges inward.... keeping the folded edges
on the outside....Press and pin.


Zig-Zag stitch, tie knots in the ends and sew onto the apron...


Easy ~!~! Fun ~!~! And a wonderful memory of my Dad ~!~!

More men's shirts w/ potholders to match...

Sunday, April 21, 2013

Palazza Pant Party

Palazza Pants
Hippie Fun 4 da Summa


Hot weather is coming and I'm ready to get cool for da summaa... I found the easiest pattern to make palazza pants (a.k.a. "clown pants") @ Wally World and have started making sassy, simple, silly, summer pants. I like clothing that really does NOT touch my body.. so these are perfect.. but still cute w/ a matching t-shirt, 
flip flops or sandals, and costume jewelry.

For this project I used 2 colors of material... black print (on sale for $3 a yard) used for the trim and a green funky print (on sale for $2 a yard) for the pants. I also bought 1" elastic... my fav... bc it doesn't roll at the waist.

It's So Easy Pattern #A2119 by Simplicity
Cost ~~ a couple of bucks...

I am able to get a pair of pants w/ 2 yards , but go by
instructions on the pattern for yardage.
For funzzz, I cut about 4" off of the bottom of the pant and
added 5" of the black print... !~!

Measure, press, and pull thru the elastic at the top.
I never hand-sew on these pants. No buttons, no
zippers, no hand-work. NO FUSS.
I just zig-zag the bottom and make a French hem.

Cool! Cute! Fun! Less than $5 bucks! and Easy!


Tuesday, March 19, 2013

Strip Quilt Mural ~ Easy

Strip Quilt Mural
Repurposing what's on Your wall
w/o Spending Much $$$
$10 Project

I had a pic that I have had for a long time that was rather large.
It hangs in the spare bedroom. The spare bedroom is a conglomerate
of mismatched furniture... an island of misfit toys. One piece from
the 1950s, which was given to me... another piece from the 1970s... also
given to me. (another outcast), and the bedframe purchased by
my hubby during his 'single' years... which is rather quite stylish
and from overstock.com. The poor saggy lamp was a resale shop pickup and
is very generic.... which is rather 'safe' in our house....
The whole room just needed some freshness... something to pull it all together... to
make it at least appear that it was purposed to be together and not just
cast aside .... :(
So... I got busy w/ a color scheme in my head... and with a lot of snooping
around on pinterest, DIY blogs, and how to sites....

I started first with the big out of date picture... A big HONKING thang... it
was just not my style and it was another 'freebie' that someone cast off on me...


 I didn't want to get rid of it or store it... so ... I decided to repurpose it.
O.. so much fun %%%
Yellow ~ Black ~ and Grey... I've been seeing these
fresh, popping, happy colors a LOT of places...
or maybe it was just the bumble bees flying around the yard....
but I just HAD TO HAVE those colors somewhere in the house~
I didn't feel brave enough to bring it into the "master"... but
what could hubby say about the guest room? NOTHIN~~~
 
AFTER


BEFORE
(sorry about the glare ~ )

I took the measurements of the frame: 27 " x 37"
and took the glass and picture out of the frame.
This is MUCH bigger than the pics show ~~


I repainted the frame Krylon / Hammered Black
(also used in the hallway)
which does look line a dark grey.
U LiKeY ? ? ?
I cut out of an old sheet the size of the frame and marked the center of the sheet.

I made a center patch w/ 5 sides and pinned it in the middle.
I then began using the "Strip Quilt" technique.
Instead of making many small ones (8x8)...
 I decided to make one BIG ONE  ! ! !

 I saw this material other
day @ Hobby Lobbyand couldn't help myself.

I got a yard of each pattern... which
was WAY too much, but gave me left overs for another project 
 ~!~! (Uhhhh.. what can I do NEXT???)
Aren't the colors GoRgeOUs ??? So yellow~ yummy !~!~!
I also added some scraps from other projects...

Making a strip quilt is easy. It just takes time.
Cut strips about 2 inches wide and rather long if making
as big project like this one.
***
Really, I recommend doing small projects first... b4 starting
one this big.... U could make coasters (Another idea pop pop popping #*#*)

Sew the strips on one at a time, being sure to cover the raw edges of the piece sewn on before. Eventually it will work outward from the 5 sided center piece.

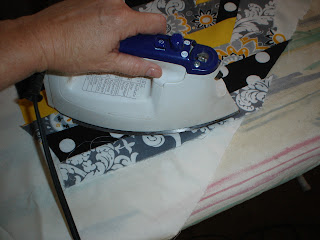
I have found it best to iron each strip BEFORE and AFTER sewing it on.

Lining up a strip before sewing it on....

Sewing on the next strip....

Now iron it down flat...
Keep adding and trimming...
(GOSH.. my hands look old.. I guess that's bc they ARE * LOL)

It all came together nicely for less than $10 ~!~!~
And hangs beautifully on the guest bedroom wall
just in time for SPRING ! Woop Woop.

AFTER
(I put my hand up there so u cld get an idea of the SIZE of this piece)

There are many youtube vids on how to make strip quilt pieces...
I watched quit a few before attempting to make strip quilt pieces.
But BEWARE ~!~!
U have been forewarned !!!
Once u get started it's VERY addictive...
U can NOT stop !!!
* * * * *
Happy DIYing