Showing posts with label spray painting. Show all posts

Tuesday, July 2, 2013

Stenciling With Lace

                           Stenciling with Lace

            Flower containers for the front porch and for Herb garden ~!~!


I have some old things in my garage that I just didn't have the heart to throw away... but not until recently decided to actually do something with them.

I found this old mailbox hanging on the wall behind our dryer and thought to myself... " wonder if that would make a cute flower container?"... hmmm. I have had a galvanized tub for years that has just sat there collecting dust. I have no room for it inside the house, so I dragged it out and began stenciling. (Hubby drilled some holes in the bottom of the tub for me.)


I decided to try something I have never done before... I found some lace that was needing use in my sewing closet and taped it to the mailbox and tub... sprayed away with Krylon paint... and peeled off the lace. I then took some greenery out of my husand's "Father's Day" arrangement and taped it to the lid of the tub.... WaLahhhh.


I think they turned out very cute and look GR8 on the front porch ~!~!~!

I really like trying things that I have never done before ~!~!

Happy DIYing!


Pretty Little Herb Garden ~!~!~!

Saturday, June 22, 2013

Backyard Happy Places

                !~!~!~!  Hello Hippy Friends  ~!~!~!


I have been busy in the backyard this summer... Our poor yard has taken a beating with this long, terrible drought. A beatin' with a long, dead, dry stick.... New Mexico is experiencing the worst drought in the entire USA right now. After two years of little rain, we are really feeling the "heat" and my poor yard is reflecting the experience.

I have decided that the backyard is in need of a little { long, over-due } TLC.  But I can honestly say I have felt overwhelmed bc our yard is BIG, SAD, and DEAD.

In trying to take this task on... I at first felt daunted... like it was insurmountable... and then I realized that there is only one way to "eat an elephant"....

I thought that starting w/ making small, "HAPPY PLACES" within this unconquerable badland would be at least do~able. I began to think of ways to create little fun, colorful  areas within the scheme of the desolation.  A friend that is working on her own yard { they are building a new home } has encouraged me by her own skills of making happy, little, fun places on her patio and around her trees ... Her own yard is HUGE... so.... watching her gave me creative spark.

Thx Butterfly ~!~!

One day this week, I looked at my tired, dejected glider. Faded... droopy.... and miserable. Now, I'm no Martha Stewart... I don't pretend to know how to sew the best... and I have never taken painting lessons but I had an idea of starting w/ this little sad~sack ....(the glider..... not Paco ~!~!) 


I found a large panel of fencing in our garage. It has been there for more than ten years.... I talked hubby into dragging it out and he made a brace and screwed it to the fence. { Thx hubby !!! U know sometimes that I'm in need of your 'manly, man-skills' . }

Off to Wal~Mart and Lowes. Black and Pink kept popping into my head and right away I found some material that I thought bright and cheerful.

The material is "ducking". I do not know how well this will hold up thru the heat that we have. But it cost me less than $20 to cover.. and so much cheaper than brand new cushions. I can change them next year very easily.
I spray painted the glider "Watermelon Pink" {Krylon} and gave the faded cushion a new cover. I didn't try to cover it exact. I made a large " pillow~case" type of cover and slipped the old cushion inside. My aunt helped out a great deal by covering the pillow and bringing an old couch cushion out of the garage to cover. I then made ties to "tie" it to the glider bc the pillows are what fly all over the yard when the wind blows. And we get horrible winds here.

Lowes has "sample" paints that are great for small projects. I purchased white, Berry Blush, and Iced Berry.  I had left over grey-black.

They cost about $2 each... (and I used very little paint ~!)


After doodling on scratch paper, I began with a pencil to stencil out what I could actually do on the fence. ... I did not use a purchased stencil. It is all done out of my own head... which means it is not perfect... But I do not aim for perfection in my projects.


I was very pleased with how this little "sitting area" turned out ~!~! It is shaded in the morning and a perfect place to sit and have my morning java and play the ukulele.
 A perfect little HaPpY pLaCe ~!~!~

                                           ~~~ Happy DIYing ~~~  


Friday, April 12, 2013

Repurposed Furniture

Repurposed Bedside Table

I've been having all kinds of fun working on the bedroom... repurposing, repainting, clearing out, and sewing ~

I was given a bedside table for free ... It's a good, sturdy piece of furniture... straight out of the 70s ( Best decade EvvvAAA) ! I decided to add a little bright POP to the room and paint it YELLOW~ Yea, dude~~~ YELLOW!

Before
Not too attractive, huh?
What I like about this kind of projects is... U just
can't make it any uglier ~~~ And u don't spend
any $$$ on the original item~

To get this project ready for painting, I needed to sand and prime first:

Sand w/ 220 paper and fine steel wool.
Wipe down w/ a clean cloth.
Use BIN primer from WalMart. I made sure
the furniture was well coated w/ 2 cans of primer.


I then smoothed down the prime coat w/ steel wool after
each coating was good and dry...I put on 3 coats of primer... I
followed all directions on the can.. and even had to wait for
a "warm" day to do this for best results...
Do urself a favor.. and follow all directions on the products !~!~!

I selected Krylon "Bright Idea"... ~!~!
So very sUnnY~~~ I used 2 cans for this project.

I also repainted a white frame to go in the same
room while I was at it.... ~

Next came the glazing... I had NEVER attempted anything like this...
faux impressions Glaze is from Sherwin Williams
and the matte finish black paint I already had...
I mixed the glaze and paint in a coffee can
1 part glaze to  3 parts paint.
This made a thick, black paint...
I used an OLD, beat up paint brush (don't ruin a good paint brush on this ....) from the garage to put the glaze
over the yellow coat... being sure to work it down into
the nooks and crannies of the furniture~
Then I took a damp cloth and wiped off as much glaze as I wanted
 until I got the "look" that I preferred....
This step I did several times... bc sometimes I wld wipe off more
than I wanted at first... but mainly, I just had FUN with this... My aim
was not to make it perfect ~~~!

I just wanted it original !

Wahhh Lahhh... !!! I was very pleased ~!

Tuesday, March 19, 2013

Strip Quilt Mural ~ Easy

Strip Quilt Mural
Repurposing what's on Your wall
w/o Spending Much $$$
$10 Project

I had a pic that I have had for a long time that was rather large.
It hangs in the spare bedroom. The spare bedroom is a conglomerate
of mismatched furniture... an island of misfit toys. One piece from
the 1950s, which was given to me... another piece from the 1970s... also
given to me. (another outcast), and the bedframe purchased by
my hubby during his 'single' years... which is rather quite stylish
and from overstock.com. The poor saggy lamp was a resale shop pickup and
is very generic.... which is rather 'safe' in our house....
The whole room just needed some freshness... something to pull it all together... to
make it at least appear that it was purposed to be together and not just
cast aside .... :(
So... I got busy w/ a color scheme in my head... and with a lot of snooping
around on pinterest, DIY blogs, and how to sites....

I started first with the big out of date picture... A big HONKING thang... it
was just not my style and it was another 'freebie' that someone cast off on me...


 I didn't want to get rid of it or store it... so ... I decided to repurpose it.
O.. so much fun %%%
Yellow ~ Black ~ and Grey... I've been seeing these
fresh, popping, happy colors a LOT of places...
or maybe it was just the bumble bees flying around the yard....
but I just HAD TO HAVE those colors somewhere in the house~
I didn't feel brave enough to bring it into the "master"... but
what could hubby say about the guest room? NOTHIN~~~
 
AFTER


BEFORE
(sorry about the glare ~ )

I took the measurements of the frame: 27 " x 37"
and took the glass and picture out of the frame.
This is MUCH bigger than the pics show ~~


I repainted the frame Krylon / Hammered Black
(also used in the hallway)
which does look line a dark grey.
U LiKeY ? ? ?
I cut out of an old sheet the size of the frame and marked the center of the sheet.

I made a center patch w/ 5 sides and pinned it in the middle.
I then began using the "Strip Quilt" technique.
Instead of making many small ones (8x8)...
 I decided to make one BIG ONE  ! ! !

 I saw this material other
day @ Hobby Lobbyand couldn't help myself.

I got a yard of each pattern... which
was WAY too much, but gave me left overs for another project 
 ~!~! (Uhhhh.. what can I do NEXT???)
Aren't the colors GoRgeOUs ??? So yellow~ yummy !~!~!
I also added some scraps from other projects...

Making a strip quilt is easy. It just takes time.
Cut strips about 2 inches wide and rather long if making
as big project like this one.
***
Really, I recommend doing small projects first... b4 starting
one this big.... U could make coasters (Another idea pop pop popping #*#*)

Sew the strips on one at a time, being sure to cover the raw edges of the piece sewn on before. Eventually it will work outward from the 5 sided center piece.

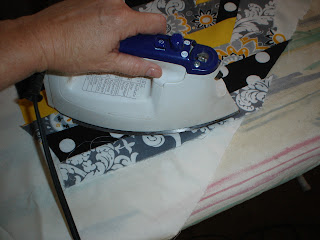
I have found it best to iron each strip BEFORE and AFTER sewing it on.

Lining up a strip before sewing it on....

Sewing on the next strip....

Now iron it down flat...
Keep adding and trimming...
(GOSH.. my hands look old.. I guess that's bc they ARE * LOL)

It all came together nicely for less than $10 ~!~!~
And hangs beautifully on the guest bedroom wall
just in time for SPRING ! Woop Woop.

AFTER
(I put my hand up there so u cld get an idea of the SIZE of this piece)

There are many youtube vids on how to make strip quilt pieces...
I watched quit a few before attempting to make strip quilt pieces.
But BEWARE ~!~!
U have been forewarned !!!
Once u get started it's VERY addictive...
U can NOT stop !!!
* * * * *
Happy DIYing


Tuesday, March 5, 2013

Painting Picture Frames

Painting Picture Frames
to match & coordinate !!!

I decided that my hallway looked kinda drab... it just needed some updating.I love pics of family and friends but sometimes the collection of frames just seems so hodge~podge.. and I wanted a little more coordination and cohesiveness. I had painted the hallway about 3 summers ago, but did nothing with the frames and wall decor. It was time for a change... a little update.... hippy style. Not wanting to spend much $$$, I decided to paint the frames I had and just coordinate them by spray painting them the same color. I like hammered black. It's a textured look and doesn't show up if you mess up too much. Even better... ~! It seems like leafy wreaths, greenery, and fake trees are on their way OUT... so I got rid of the grapevine over the frames and pulled a wall decorative thing off of the wall of the bedroom. It was gold and wasn't doing much in that room anyway. I spray painted it a turquoise blue... and instantly LOVD it!!! O WOW... ~ And I don't even like blue all that much ~!!!  But for some reason it really popped to me and I think it looks really great over the black frames. So, this little project took little to no time, little too no money... and that's very hippie.... bc we hippies like things free and for a great price ~!~!

Before          &&&&          After

But I do not have much in the $$$ budget for new picture frames that match!  So.... I took the pics off of my hallway wall today and painted them...

I used Black Metallic Krylon Fusion Hammered Finish, which looked more like grey when finished.


  • Dries in 15 minutes
  • No sanding or priming
  • Use inside and out on most plastics
Great for wood, metal, ceramic and more!

How can it get any easier that THAT???

I simply removed the pics, dusted the frames, laid them outside on trashbags, and SPRAYED.


Once they were dry... I put the pics back in and rehung. I think that my hallway now looks a little more "put~together" and coordinated! Such an easy project for less than $5 bucks!

While I was in the "painting mode" I went ahead and bought some turquoise paint, then sprayed a  gold wall deco piece that I had purchased @ Hobby Lobby (on 70% off)  a lo~o~o~ng time ago. It took some searching but I finally found Valspar - Gloss Topical Oasis @ Lowe's. I sprayed the piece to replace the vine swag originally over the pics. I also dug out a beautiful crocheted pic out from the back of the closet and put it on the wall. . . .

Now it's finished


I really don't hang pictures very straight! I need to work on that! LOL

Happy Painting~!~!~!