Strip Quilt Mural
Repurposing what's on Your wall
w/o Spending Much $$$
$10 Project
I had a pic that I have had for a long time that was rather large.
It hangs in the spare bedroom. The spare bedroom is a conglomerate
of mismatched furniture... an island of misfit toys. One piece from
the 1950s, which was given to me... another piece from the 1970s... also
given to me. (another outcast), and the bedframe purchased by
my hubby during his 'single' years... which is rather quite stylish
and from overstock.com. The poor saggy lamp was a resale shop pickup and
is very generic.... which is rather 'safe' in our house....
The whole room just needed some freshness... something to pull it all together... to
make it at least appear that it was purposed to be together and not just
cast aside .... :(
So... I got busy w/ a color scheme in my head... and with a lot of snooping
around on pinterest, DIY blogs, and how to sites....
I started first with the big out of date picture... A big HONKING thang... it
was just not my style and it was another 'freebie' that someone cast off on me...
I didn't want to get rid of it or store it... so ... I decided to repurpose it.
O.. so much fun %%%
Yellow ~ Black ~ and Grey... I've been seeing these
fresh, popping, happy colors a LOT of places...
or maybe it was just the bumble bees flying around the yard....
but I just HAD TO HAVE those colors somewhere in the house~
I didn't feel brave enough to bring it into the "master"... but
what could hubby say about the guest room? NOTHIN~~~
fresh, popping, happy colors a LOT of places...
or maybe it was just the bumble bees flying around the yard....
but I just HAD TO HAVE those colors somewhere in the house~
I didn't feel brave enough to bring it into the "master"... but
what could hubby say about the guest room? NOTHIN~~~
AFTER
BEFORE
(sorry about the glare ~ )
I took the measurements of the frame: 27 " x 37"
and took the glass and picture out of the frame.
This is MUCH bigger than the pics show ~~
I repainted the frame Krylon / Hammered Black
(also used in the hallway)
which does look line a dark grey.
U LiKeY ? ? ?
I cut out of an old sheet the size of the frame and marked the center of the sheet.
I made a center patch w/ 5 sides and pinned it in the middle.
I then began using the "Strip Quilt" technique.
Instead of making many small ones (8x8)...
I decided to make one BIG ONE ! ! !
I saw this material other
day @ Hobby Lobbyand couldn't help myself.
I got a yard of each pattern... which
was WAY too much, but gave me left overs for another project
~!~! (Uhhhh.. what can I do NEXT???)
Aren't the colors GoRgeOUs ??? So yellow~ yummy !~!~!
I also added some scraps from other projects...
Making a strip quilt is easy. It just takes time.
Cut strips about 2 inches wide and rather long if making
as big project like this one.
***
Really, I recommend doing small projects first... b4 starting
one this big.... U could make coasters (Another idea pop pop popping #*#*)
Sew the strips on one at a time, being sure to cover the raw edges of the piece sewn on before. Eventually it will work outward from the 5 sided center piece.
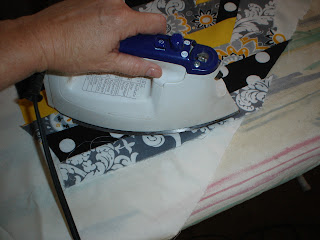
I have found it best to iron each strip BEFORE and AFTER sewing it on.
Lining up a strip before sewing it on....
Sewing on the next strip....
Now iron it down flat...
Keep adding and trimming...
(GOSH.. my hands look old.. I guess that's bc they ARE * LOL)
It all came together nicely for less than $10 ~!~!~
And hangs beautifully on the guest bedroom wall
just in time for SPRING ! Woop Woop.
AFTER
(I put my hand up there so u cld get an idea of the SIZE of this piece)
There are many youtube vids on how to make strip quilt pieces...
I watched quit a few before attempting to make strip quilt pieces.
But BEWARE ~!~!
U have been forewarned !!!
Once u get started it's VERY addictive...
U can NOT stop !!!
* * * * *
Happy DIYing


No comments:
Post a Comment