Showing posts with label easy. Show all posts

Monday, June 3, 2013

Aprons Out of Men's Shirts

Apron Made Out of a Man's Shirt
Repurposed Men's Shirts

This project is easy and fun. I like easy and fun... it's a great combo! My father passed more than two years ago and Mom gave me some of his dress shirts. A friend passed on a simple idea of making an apron out of a man's shirt. Dad wore a 2x tall-man and I knew this would be ideal... bc I need a large apron to cover up all the messes I make while cooking! I'm one sloppy cook! I knew this would be a great way to preserve memories and times of happiness w/ my dad bc this was his favorite shirt. We saw him wear it many times through the years.


Very cute and simple apron~!~!

How To...

Cut off the sleeves, and the back of the shirt. Be sure to leave about
and inch or more next to the seam because this will be tucked and sewn down
on top of the side seam that is already there.

From the collar, shoulder seam, measure 2 inches and mark with a pencil or
marking pen.

Measure from the mark to the bottom of the arm pit and draw
a straight line. Cut on that line.

You will need to iron (hippies always use irons and pins when they sew)
the seam making a "french hem" (sometimes called a shirt tale hem). Iron and then pin
into place as you go. Do this all around the apron: up both sides and to the collar and around the collar.

This hippie is the Queen of Zig-Zag. Begin zig-zagging close to one side of the
hem and then make another zig-zag stitch right next to it. This will ensure
that the hem is held into place and will not come unraveled during the wash.
I also like the "look" of this finish. I resembles a surger... I
don't have one .... so this comes close to making that stitch (in my
novice opinion).

For the ties, Cut out two long strips from the remnants. Make them 2 inches
wide. Press a center fold and then fold both edges inward.... keeping the folded edges
on the outside....Press and pin.


Zig-Zag stitch, tie knots in the ends and sew onto the apron...


Easy ~!~! Fun ~!~! And a wonderful memory of my Dad ~!~!

More men's shirts w/ potholders to match...

Thursday, April 25, 2013

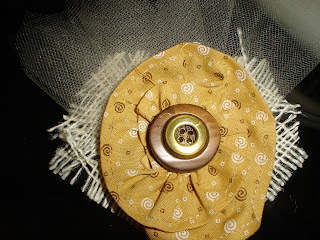
Flower Power Pin


Flower Power Pin


This little project is easy. It takes no time at all...I made it out of scraps.
I used ....

felt, material (made into a pinwheel) buttons, clasp,
tow-sack material, and tulle, and a glue-gun.
I cute the felt into a circle and then glued the
clasp onto the back.
Glued the tow-sack, tulle, and flower in layers.
Glued the buttons on top.

Put them together....

Trimmed up the tulle and splayed out the two-sack...

Cute on a brown corduroy jacket
with matching t-shirt !~!~!


Sunday, April 21, 2013

Palazza Pant Party

Palazza Pants
Hippie Fun 4 da Summa


Hot weather is coming and I'm ready to get cool for da summaa... I found the easiest pattern to make palazza pants (a.k.a. "clown pants") @ Wally World and have started making sassy, simple, silly, summer pants. I like clothing that really does NOT touch my body.. so these are perfect.. but still cute w/ a matching t-shirt, 
flip flops or sandals, and costume jewelry.

For this project I used 2 colors of material... black print (on sale for $3 a yard) used for the trim and a green funky print (on sale for $2 a yard) for the pants. I also bought 1" elastic... my fav... bc it doesn't roll at the waist.

It's So Easy Pattern #A2119 by Simplicity
Cost ~~ a couple of bucks...

I am able to get a pair of pants w/ 2 yards , but go by
instructions on the pattern for yardage.
For funzzz, I cut about 4" off of the bottom of the pant and
added 5" of the black print... !~!

Measure, press, and pull thru the elastic at the top.
I never hand-sew on these pants. No buttons, no
zippers, no hand-work. NO FUSS.
I just zig-zag the bottom and make a French hem.

Cool! Cute! Fun! Less than $5 bucks! and Easy!


Tuesday, March 12, 2013

FraMed Dry~EraSe NoTepAd

FraMed   ( dRy~EraSe )   NoTEpaD


My hubby and I leave little "notes" of luv and appreciation
to each other all the time. I have stacks of note pad papers
with sweet little notes from him.... but I decided to try
something funky and fun.... A dry~erase notepad ~!~!
This is so simple. I made it all out of scraps I had around the house.
All I had to buy were the dry~erase markers for $1.
I already had the black frame from the Dollar Store.

Take a frame that u are not using. Trim material, special paper, or something u like to fit into frame. In this case I used scrap~book paper that I will never use up.
Make a cute flower out of matching material.
In this project I used some tow~sack material that had been given to me.
 Cut a strip about an inch thick and 12" long.
Cut out a circle of felt.

Begin glueing the material onto the felt, making pleats as you go.
The only hard part about this is not burning your fingers! (which I do every time)

Then use a decorative piece of jewelry, buttons, or something you
have in your craft box as the center of the flower.
I used 2 buttons...
Glue onto side of frame!

Now u can leave notes to those u love around the house w/o having
to look for paper ~!~!
Cute ~ Cute ~ Cute !
Easy ~ Easy ~ Easy !
Now, leaving little "heart" notes to
hubby is much more fun ~!!!